Configuring IIQ Servers
Overview
The ITF IntelliJ plugin provides two methods for configuring IdentityIQ server connections:
- Preferred Configuration - Modern table-based configuration with direct server management
- Legacy Configuration - File-based configuration using
*.target.propertiesfiles
This document describes the preferred configuration method, which provides a more streamlined approach to managing IIQ server connections.
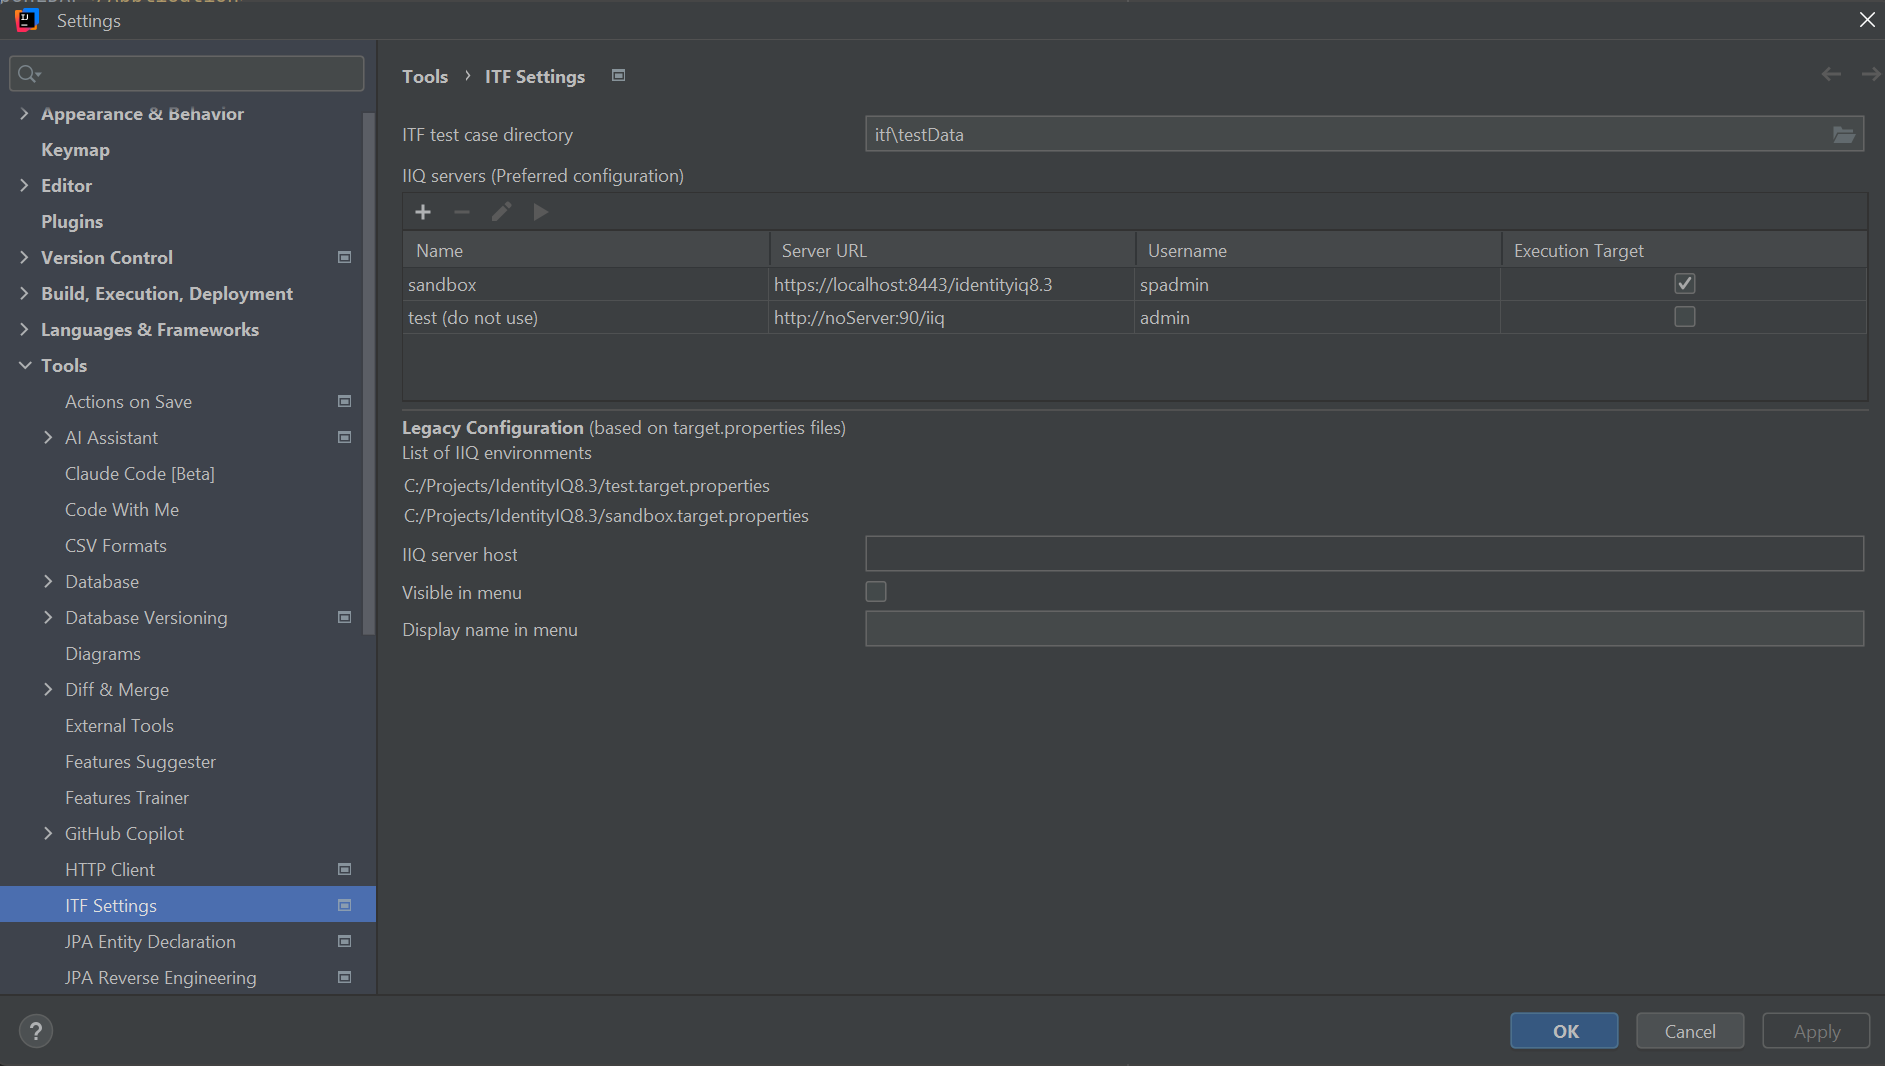
Accessing Server Configuration
To access the IIQ server configuration:
- Open IntelliJ IDEA settings/preferences
- Navigate to Tools → ITF Settings
- The configuration panel displays both configuration methods
IIQ Server Configuration Fields
Each IIQ server configuration consists of the following fields:
Name
- Purpose: Identifies the server configuration in the list and menus
- Required: Yes
- Format: Free-form text
- Example:
DEV Server,QA Environment,Local IIQ - Usage: This name appears in execution menus and dropdowns when selecting which server to run tests against
Server URL
- Purpose: Specifies the full URL to the IdentityIQ application
- Required: Yes
- Format: Complete URL including protocol, host, port, and context path
- Example:
https://localhost:8080/identityiq - Usage: ITF uses this URL to connect to the IIQ REST API endpoints
- Notes:
- Must include the protocol (
http://orhttps://) - Must include the IIQ context path (typically
/identityiqor/identity) - Do not include trailing slash
Username
- Purpose: Username for authenticating to the IIQ server
- Required: Yes (for connection testing and execution)
- Format: Valid IdentityIQ username
- Example:
spadmin - Usage: ITF authenticates with this username when executing test commands
- Notes: The user must have sufficient privileges to perform the operations in your test cases
Password
- Purpose: Password for the specified username
- Required: Yes (for connection testing and execution)
- Format: Plain text password
- Security: Stored in IntelliJ's secure password storage
- Usage: Used together with the username for authentication
- Notes: Not displayed in the server list table for security reasons
Target Properties
- Purpose: Path to a
*.target.propertiesfile for token replacement during test execution - Required: No
- Format: Absolute or relative file path
- Example:
C:\itf\resources\dev.target.propertiesoritf/resources/qa.target.properties - Usage: If specified, ITF uses this properties file for token replacement in test case XML files (e.g., replacing
%%AD_HOST%%with actual values) - Notes:
- File must have
.target.propertiesextension - Browse button provides file picker filtered to
.target.propertiesfiles - Leave empty if no token replacement is needed
Execution Target
- Purpose: Designates which server is the default target for test execution
- Required: No (but recommended to set one)
- Format: Boolean checkbox
- Behavior:
- Only one server can be marked as execution target at a time
- When you mark a server as execution target, any previously selected execution target is automatically cleared
- This server becomes the default when running tests
- Usage: The execution target server is automatically selected when launching tests from the IDE
Adding a New IIQ Server
To add a new IIQ server configuration:
- Click the + (Add) button in the IIQ Servers toolbar
- The "Add IIQ Server" dialog appears
- Enter the required fields:
- Name: Enter a descriptive name for this server
- Server URL: Enter the complete URL to the IIQ instance
- Username: Enter the IIQ username
- Password: Enter the password
- Optionally configure:
- Target Properties: Browse to select a
.target.propertiesfile if needed - Execution Target: Check this box to make this server the default execution target
- Click OK to save
The new server appears in the IIQ Servers table.
Validation
The OK button is only enabled when: - Name field is not empty - Server URL field is not empty
This ensures minimum required configuration is provided.
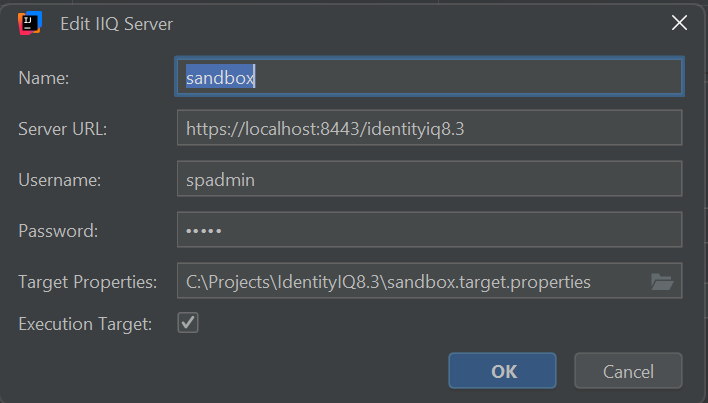
Modifying an Existing IIQ Server
To edit an existing server configuration:
- Select the server in the IIQ Servers table
- Click the pencil (Edit) button in the toolbar (or double-click the row)
- The "Edit IIQ Server" dialog appears with current values populated
- Modify the desired fields
- Click OK to save changes
All fields can be modified, including changing which server is the execution target.
Changing the Execution Target
You can change the execution target in two ways:
Method 1: Via Edit Dialog 1. Edit the server you want to make the execution target 2. Check the "Execution Target" checkbox 3. Click OK 4. Any previously selected execution target is automatically cleared
Method 2: Direct Table Edit 1. Click directly on the "Execution Target" checkbox in the table 2. The selection automatically moves to the clicked server 3. The previous execution target is automatically cleared
Deleting an IIQ Server
To remove a server configuration:
- Select the server in the IIQ Servers table
- Click the - (Remove) button in the toolbar
- A confirmation dialog appears: "Are you sure you want to remove this IIQ server configuration?"
- Click Yes to confirm deletion, or No to cancel
The server configuration is permanently removed from the list.
Important Notes
- Deleting a server cannot be undone (unless you cancel the settings dialog without applying)
- If you delete the execution target server, no server will be marked as execution target
- You should designate a new execution target after deleting the current one
Testing IIQ Server Connections
To verify connectivity to an IIQ server:
- Select the server in the IIQ Servers table
- Click the ▶ (Test Connection) button in the toolbar
- The plugin attempts to connect to the server using the configured credentials
- A result dialog appears showing:
- Success: "Test Connection to [Server Name] - Success" with server details
- Error: "Test Connection to [Server Name] - Error" with error details


Test Connection Details
The test connection:
- Uses the configured Server URL, Username, and Password
- Sends a GET request to the IIQ REST API test endpoint (/test)
- Validates HTTP response status
- Reports any network, authentication, or SSL certificate errors
Common Connection Issues
| Error | Possible Cause | Solution |
|---|---|---|
| Connection refused | IIQ server is not running | Start the IIQ application server |
| Unknown host | Incorrect hostname/IP in Server URL | Verify the Server URL is correct |
| SSL handshake failed | Certificate issues with HTTPS | Check SSL certificate configuration or use HTTP for local testing |
| 401 Unauthorized | Invalid credentials | Verify Username and Password are correct |
| 404 Not found | Incorrect context path | Verify the IIQ context path in Server URL |
| Timeout | Network connectivity issues | Check network connectivity and firewall rules |
Server Configuration Table
The IIQ Servers table displays the following columns:
| Column | Description | Editable |
|---|---|---|
| Name | Server configuration name | No (edit via dialog) |
| Server URL | Full URL to IIQ instance | No (edit via dialog) |
| Username | IIQ username for authentication | No (edit via dialog) |
| Execution Target | Checkbox indicating default execution target | Yes (click to toggle) |
Password and Target Properties are stored but not displayed in the table.

Configuring the Execution Environment
What is the Execution Target?
The Execution Target designates which IIQ server will be used when you run ITF test cases from the IntelliJ IDE. This eliminates the need to manually select a server each time you execute tests.
Setting the Execution Target
Important Rules: - Only one server can be the execution target at any time - The system automatically enforces this constraint - When you mark a server as execution target, the previous execution target is automatically cleared
How to Set: 1. Edit the desired server or click its Execution Target checkbox in the table 2. The server is now marked as the execution target 3. All test executions will use this server by default
Execution Workflow
When you run an ITF test case: 1. The plugin checks which server is marked as Execution Target 2. Test execution uses that server's: - Server URL (for connecting to IIQ) - Username and Password (for authentication) - Target Properties file (for token replacement, if configured) 3. Results are displayed in the IDE
Best Practices
Server Naming
- Use clear, descriptive names:
DEV - Local,QA Environment,Production (Read-Only) - Include environment type in the name for easy identification
- Avoid generic names like "Server1" or "Test"
Multiple Environments
- Configure all environments you regularly work with (DEV, QA, UAT, etc.)
- Use consistent naming conventions across environments
- Set your primary development environment as the Execution Target
- Use Target Properties files to manage environment-specific tokens
Testing Connections
- Test connections after initial configuration
- Re-test connections after credential changes
- Re-test connections after server URL changes (upgrades, migrations)
- Use test connections to validate connectivity before running long test suites
Troubleshooting
Server Not Appearing in Execution Menu
- Verify the server is saved in the ITF Settings
- Check that IntelliJ settings were applied (click Apply or OK)
- Restart IntelliJ if server list doesn't refresh
Tests Running Against Wrong Server
- Check which server is marked as Execution Target in the IIQ Servers table
- Verify only one server has the Execution Target checkbox selected
- Clear and re-set the Execution Target if behavior is inconsistent
Token Replacement Not Working
- Verify the Target Properties file path is correct
- Check that the file exists and is readable
- Ensure the
.target.propertiesfile contains the required token definitions - Verify token syntax in test case XML matches the properties file (e.g.,
%%TOKEN_NAME%%)
Cannot Delete or Edit Servers
- Ensure a server is selected in the table
- Check that the settings dialog is not in a locked state
- Try restarting IntelliJ if UI appears unresponsive
Comparison: Preferred vs Legacy Configuration
| Aspect | Preferred Configuration | Legacy Configuration |
|---|---|---|
| Interface | Table-based with dialogs | List-based, file-dependent |
| Storage | IntelliJ settings | *.target.properties files |
| Credentials | Stored securely per server | Stored in properties files |
| Ease of Use | Direct add/edit/delete | Requires file management |
| Connection Testing | Built-in test button | Manual verification |
| Execution Target | Single checkbox | Based on file selection |
| Migration Path | Recommended for new setups | Maintained for backward compatibility |
Related Documentation
- ITF Installation and Configuration - Initial setup and installation
- IIQ Connectivity - Detailed connectivity concepts and
target.propertiesformat - ITF Testing Concepts - Understanding ITF test structure
- ITF XML Reference - Complete command reference for test cases